The article has been updated successfully.
| Knowledgebase Home | Glossary | Favorites | Contact | Login |
| Drip Marketing with Act4Advisors | |||||||
|
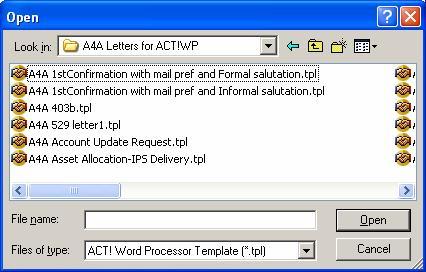
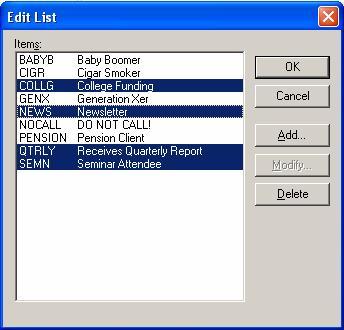
There are various ways you can accomplish your drip marketing with ACT! but I will explain just one at this time. Before you begin, make a backup of your database. In drip marketing, the first things to decide include: 1. Who and how to group contacts (people in your database)? (i.e. demographics) 2. What information would this group be interested in and "bite on"? (i.e. interests and letters, emails or call scripts) 3. How often will you "touch" this group with letters, emails and/or calls? (Read these two articles Creating Activity Series and Creating Processes and Procedures with Activity Series) For example, if you want to target young families, you might choose a theme like College Funding. The letters might include 529, Coverdell, UGMA, Budgeting, College Loans, etc. Act4Advisors has some marketing and service letters but you might ask your fund wholesaler, your broker dealer or your Advisory firm for their letter library. You may want to send out 2-3 letters a month followed by one phone call. (If you are a registered representative, be sure to get all letters approved with your broker dealer before you use them.) Feel free to modify existing letters or if you have letter content, copy and paste it into an existing Act4Advisors letter template and be sure to “save as” a different template name. We recommend pasting into the A4A Preferred Address template but be sure to rename the template. To edit a template, click on Write > Edit Document Template. A folder with letters provided by Act4Advisors is in a subfolder called A4A Letters for ACT!WP. These templates only work with the ACT! Word Processor. If you would like to use then with MS Word, you will have to copy and paste the text into one of our MS Word Template for ACT!
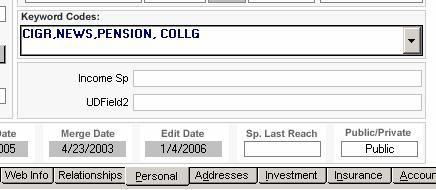
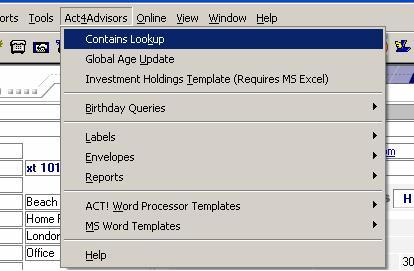
Next, click on Contains Lookup and type or select the code you want to search for. Press OK. This will create a lookup of all the contacts that have the keycode somewhere inside the keycode field.
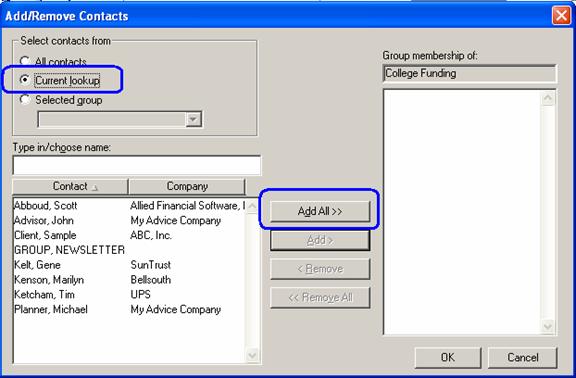
If you have a large number of contact's in the group, I suggest you create a contact whose name is the group name, ie. a contact named "College Funding Group". You would then add this contact to the group individually by clicking on the Group tab in the Contact view and then right mouse click. Choose Group Membership and choose the College Funding group to put this contact in the group. (SIDE NOTE) We are adding this contact with the group name to avoid having to create individual activities for all contacts in the group. This is appropriate for groups with large numbers of contacts. This will require only one activity in your task list for the entire group as opposed to numerous activities in your task list for each contact in the same group. Next, you will want to schedule a preset activity series for this contact. For more information about activity series, please read these two documents; Creating an Activity Series and Creating Processes and Procedures with Activity Series. To schedule an activity series you have already created for this drip campaign, click on Contact > Schedule Activity Series. Choose the date you would like to start the drip campaign and select the campaign. At this point you would have scheduled a large number of followup activities including letter and emails to be sent and calls to be made. Each day, you will check your Task List to see what is suppose to be done today. If the Activity is for the College Funding Group and the activity is Send 529 letter, you would simply lookup everyone in the group and do a mail merge with the appropriate letter. If you want to create an individual "history" for each contact that was sent the letter, create a lookup of the group and go to the Contact List View. Highlight all contacts if your are in the Edit Mode OR "Tag All" if in the Tag mode. Next, click on Contact > Record History. Associate to the College Funding group and type in any other information you want to add to the history. When you click OK, each of these histories will be posted to each contact. |
|
||||||
| Related Articles |
| Attachments |
| No attachments were found. |
|
ACT! is a registered trademark of Sage Software, Inc.:::Allied Financial Software, Inc. Copyright 1999-2009
|