|
E-mail issues when using Microsoft Outlook with ACT! can result from several causes. Follow the instructions in each section below, and then test your e-mail functionality until the issue is resolved.
Default E-mail Client:
Microsoft Outlook must be set as the default e-mail client for Windows. Use the steps below to verify this setting:
1. Close ACT! and Outlook.
2. Open Internet Explorer.
3. Click the Tools menu, then click Internet Options. The Internet Options dialog appears.
4. Under the Programs tab, make sure that the E-mail field displays Microsoft Outlook.
5. Click Apply, then click OK.
6. Exit Internet Explorer.
Mail Format Settings in Outlook:
If Microsoft Outlook uses Microsoft Word to edit e-mail messages, this can interfere with other programs communicating with Outlook. If you use MS Outlook 2003 through an Exchange server, you must ensure that Cached Exchange Mode is disabled for your Exchange E-mail account. Also, Outlook needs to be set to compose messages in HTML format. In addition, it is recommended that the options for Microsoft Word to edit or read Rich Text e-mail messages be cleared (as illustrated below).
Please use the steps below to verify these settings:
1. Close ACT!.
2. Open Outlook.
3. Click the Tools menu, then click Options. The Options dialog appears.

4. Under the Mail Format tab, be sure that HTML is displayed in the Compose in this message format: field. (Rich Text may also work, the important thing is it NOT be set to Plain Text.)
5. Clear the Use Microsoft Word to edit e-mail messages and the User Microsoft Word to read Rich Text e-mail messages options.
6. Click Apply, then click OK.
Using MS Outlook 2003 through an Exchange Server with Cached Mode Enabled
If you are using MS Outlook 2003 through an Exchange server, issues can arise if Cached Exchange Mode is enabled. Follow the steps below to ensure that Cached Exchange Mode is not enabled in your Microsoft Outlook 2003 E-mail account:
1. Close ACT! and open MS Outlook.
2. Click the Tools menu, and then click E-mail Accounts. The E-mail Accounts dialog box appears.
3. Enable the View or change existing e-mail accounts option is enabled, and then click Next. Another E-mail Accounts dialog box appears.
4. In the Outlook processes e-mail for these accounts in the following order list, click the Exchange Server e-mail account, and then click Change. A third E-mail Accounts dialog box appears.
5. Ensure that the Use Cached Exchange Mode option is clear, and then click Next. The second E-mail Accounts dialog box re-appears.
6. Click Finish, close and then reopen MS Outlook to complete the process.
Ensure that the ACT! Add-In is selected
1. Open Outlook.
2. Click Tools and select Options.
3. Click the Other tab and click the Advanced Options button.
4. Click the Add-In Manager button. The following Add-In Manager dialog box appears:
5. Check the box next to ACT! Extensions if it is not already checked then click OK.
6. Click OK on the Advanced Options dialog box and click OK on the Other dialog box to close the window.
Clear Disabled Items
1. Open Outlook
2. Click the Help menu and then click About Microsoft Outlook
3. In the lower right-hand corner, click the Disabled Items button
4. You will see at least one item listed in the Disabled Items window. Look for a file path that ends with either ACT7EXT.DLL or ACT7AB32.DLL (capitalization may differ). This path will vary depending on your operating system. (Looking at the end of the path is the easiest method for locating the ACT! add-in components.)
5. If you see either of the two items mentioned in step 4, enable them.
6. Close Outlook and ACT!
7. Restart Outlook.
Detect and Repair:
Note: You will probably need your Microsoft Office Installation CD to perform the Detect and Repair. DO NOT perform the Detect and Repair unless the CD is available or the MSOffice installation files are accessible on your network.
Microsoft Office 2003/2002 (XP) and 2000 have a Detect and Repair function that can resolve issues with the installation and configuration of Outlook. This feature may also be able to repair corrupt e-mail messages that can cause issues. Use the following steps to run Detect and Repair for Microsoft Office:
Note: The following information is provided as a convenience. Sage Software, Small Business Division, does not provide support for Microsoft Products. For more information on this topic go to Microsoft.com.
1. Close ACT! and any other running programs.
2. Open Outlook.
3. Click the Help menu, then click Detect and Repair. The Detect and Repair dialog appears.
4. Click Start. You may be prompted to insert the Microsoft Office Installation CD.
5. Once the Detect and Repair is complete, restart Windows.
For additional details regarding the Detect and Repair utility, refer to the link below for your version of Microsoft Office:
General Detect and Repair information
http://www.microsoft.com/resources/documentation/office/xp/all/reskit/en-us/adma01.mspx
Microsoft Office 2000
http://office.microsoft.com/en-us/assistance/HA010548851033.aspx http://support.microsoft.com/?kbid=291957
Microsoft Office 2003/2002
http://support.microsoft.com/?id=821593
SCANPST.EXE - The Outlook Inbox Repair Tool:
The Microsoft Outlook data file that stores e-mail messages is the Personal Folders (.pst) file. The Personal Folders (.pst) file can be assigned to be the default delivery location for e-mail messages or you can use a Personal Folders (.pst) file to back up or organize e-mail messages.
If ACT! is not able to open the Personal Folders (.pst) file, or you suspect that this data file is damaged, you can use the SCANPST.EXE file to diagnose and repair errors. If your mailbox is located on a Microsoft Exchange Server, it is not necessary to run this executable file to repair your Inbox.
The Inbox Repair tool is installed when you install Microsoft Outlook and works on both the Microsoft Outlook Personal Folders File (.pst) and the Outlook Personal Folders File (.pst) data files.
For information on using the Outlook Inbox Repair Tool click the link below:
http://office.microsoft.com/en-us/assistance/HP010210641033.aspx
Creating a New Outlook Profile:
Outlook uses Profiles to store e-mail account information (including where your e-mail is stored). A Profile is created the first time Outlook is opened. Most users only need one Profile. However, you may find it to your advantage to create more than one Profile; if (for example) you need a personal e-mail account that is different from your work e-mail account. If you share your computer with other users, their e-mail accounts and settings can be kept in a separate Profile.
For additional information regarding Outlook Profiles, click the following link:
http://office.microsoft.com/en-us/assistance/HA011471581033.aspx
Note: The following information is provided as a convenience. Sage Software, Small Business Division, does not provide support for Microsoft Products. For more information on this topic go to Microsoft.com
Adding a Corporate or Workgroup (CW) Profile to Outlook 2000:
To set up an Outlook profile in Corporate or Workgroup mode:
1. Click the Window Start button, point to Settings, and then click Control Panel. (On Windows XP, click the Start button, and then click Control Panel.) The Control Panel opens.
2. Double-click on the Mail icon. (On Windows 2003/XP, if there is an link to Switch to Classic View in the upper-left corner of the window. Click this link, and then double-click the Mail icon.)

The Microsoft Outlook Internet Settings Properties dialog box appears.
3. Click Show Profiles to switch to the Mail dialog box.
4. Click Add to create a new profile in Microsoft Outlook. The Microsoft Outlook Setup Wizard opens.
5. Click Use the following information services option, and then select the Internet E-mail check box. Click Next to advance the wizard.
6. In the Profile Name box, enter a name for the new profile. Click Next.
7. Click Setup Mail Account. The Properties dialog box appears.
8. Click the General tab. Enter a name for the mail account in the box under Mail Account. Under User Information, enter the Name, Organization, E-mail address, and Reply address as appropriate for the account you are setting up.
Note: The title of the dialog box will update to reflect the Mail Account name.

9. Click the Servers tab. Under Server Information, enter the Incoming mail (POP3) and Outgoing mail (SMTP) server names. Under Incoming Mail Server, enter the Account name. You can either enter the Password now and have it remembered by selecting the Remember password check box, or you can leave the Password box blank, and enter the password later. If your mail servers require authentication, check the appropriate boxes.

10. Click the Connection tab. Under Connection, leave the Connect using my local area network (LAN) option clicked, unless you know the setting should be something else.

11. (Optional) Click the Advanced tab. Make any modifications as you require.
12. Click Apply, and then click OK to save the settings and close the Properties dialog box. Click Next to advance the setup wizard.
13. Either accept the path to the Personal Folders file, or click Browse to locate a file you previously set up (If setting up Outlook for the first time, accept the suggested path and file). Click Next to advance the setup wizard.
14. The final page of the wizard shows what items were set up. The following figure indicates Outlook set up the Internet E-mail account, an Outlook Address Book, and Personal Folders for this profile. Click Finish to complete the wizard.
15. The Mail dialog box now has a new entry for the Outlook settings you just configured. If there are multiple profiles in the list, click the one you want to open by default in the When starting Microsoft Outlook, use this profile drop-down list. Click Close. Close the Control Panel.
For more information on this topic please see the following Microsoft Knowledge Base document:
Title: Switching from One Installation Type to Another
Document ID: Q195507
Web URL: http://support.microsoft.com/default.aspx?scid=kb;en-us;Q195507
Adding Internet Mail Service to Outlook 2000:
When switching from Outlook from Internet Mail Only mode to Corporate or Workgroup mode, you find that you no longer have Internet E-mail services available.
To add Internet E-mail service to Outlook 2000:
1. Launch Outlook.
2. On the Tools menu, click Services. The Services dialog box appears.
3. Click the Services tab.
4. Verify that you do not see an Internet E-mail item in the list of services. If you do not see an Internet E-mail entry, click Add. The Add Service to Profile dialog box appears.
Note: The following image does have an Internet E-mail entry.
5. In the Available information services list, click Internet E-mail, and then click OK. The Mail Account Properties dialog box appears.
6. Click the General tab. Enter a name for the mail account in the box under Mail Account. Under User Information, enter the Name, Organization, E-mail address, and Reply address as appropriate for the account you are setting up.
Note: The title of the dialog box will update to reflect the Mail Account name.
7. Click the Servers tab. Under Server Information, enter the Incoming mail (POP3) and Outgoing mail (SMTP) server names. Under Incoming Mail Server, enter the> Account name. You can either enter the Password now and have it remembered by selecting the Remember password check box, or you can leave the Password box blank, and enter the password later. If your mail servers require authentication, check the appropriate boxes.
8. Click the Connection tab. Under Connection, leave the Connect using my local area network (LAN) option clicked, unless you know the setting should be something else.

9. (Optional) Click the Advanced tab. Make any modifications as you require.

10. Click Apply, and then click OK to save the settings and close the Properties dialog box. You will receive a confirmation message indicating you will need to exit Outlook and then launch it again for the changes to take affect. Click OK. Click OK again to close the Services dialog box.
11. Exit Outlook.
12. Launch Outlook.
For more information on this topic please see the following Microsoft Knowledge Base documents:
Title : Switching from One Installation Type to Another
Document ID : Q195507
Web URL : http://support.microsoft.com/default.aspx?scid=kb;en-us;Q195507
Title : Configuring the Internet E-mail Information Service
Document ID : Q195500
Web URL : http://support.microsoft.com/default.aspx?scid=kb;en-us;q195500
Adding an Account and Profile to Outlook 2003/2002 (XP):
To add a profile to Outlook 2003/2002:
1. Click the Windows Start button, and then click Control Panel. The Control Panel opens.
2. Double-click on the Mail icon. (It is recommended that you Switch to Classic View in the upper-left corner of the window click it, and then double-click the Mail icon.)

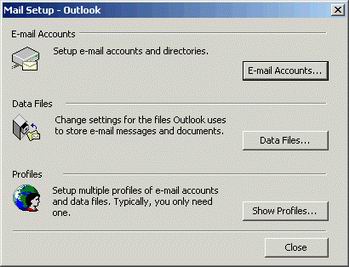
The Mail Setup - Outlook dialog box appears.
3. Click E-mail Accounts. The E-mail Accounts dialog box appears.
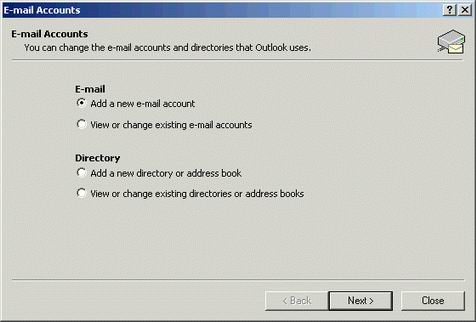
4. Click Add a new e-mail account, and then click Next to advance the wizard.
5. Click POP3, and then click Next to advance the wizard.

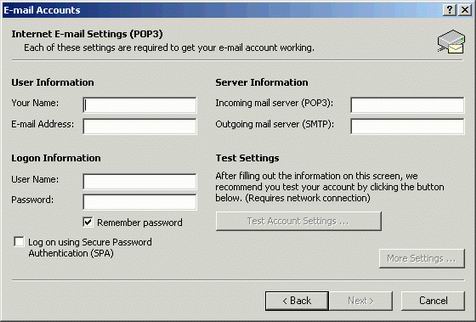
6. Fill in your POP3 account settings in the boxes provided. When finished, click Next to advance the wizard.
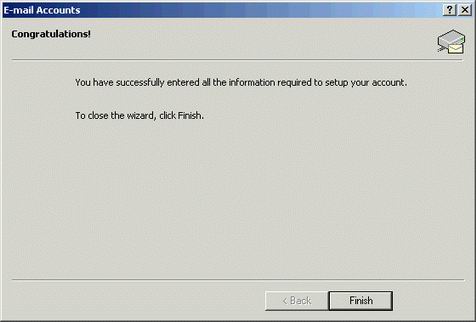
7. The final page of the E-mail Accounts wizard confirms you have successfully set up a profile. Click Finish to complete the wizard.
For more information on this topic please see the following Microsoft Knowledge Base document:
Title: How to Create a New E-mail Profile for Outlook
Document ID: Q287072
Web URL: http://support.microsoft.com/default.aspx?scid=kb;en-us;Q287072 |  The article has been updated successfully.


