Question:
You are attempting to install or uninstall ACT! when Windows does not allow you access to needed files or folders. This can be caused by the User Account Control (UAC) feature in Windows Vista. You must temporary disable this feature.
Answer:
The following Answer will provide five methods to disable the User Account Control (UAC) feature in Windows Vista. The first is the most direct:
Note: The following information is provided as a convenience. Sage Software, Small Business Division, does not provide support for Microsoft Products. For more information on this topic go to Microsoft.com.
Method One - Using the Control Panel:
Use the following steps:
- Click the Windows Start button, point to Settings, and then click Control Panel. The Control Panel appears.
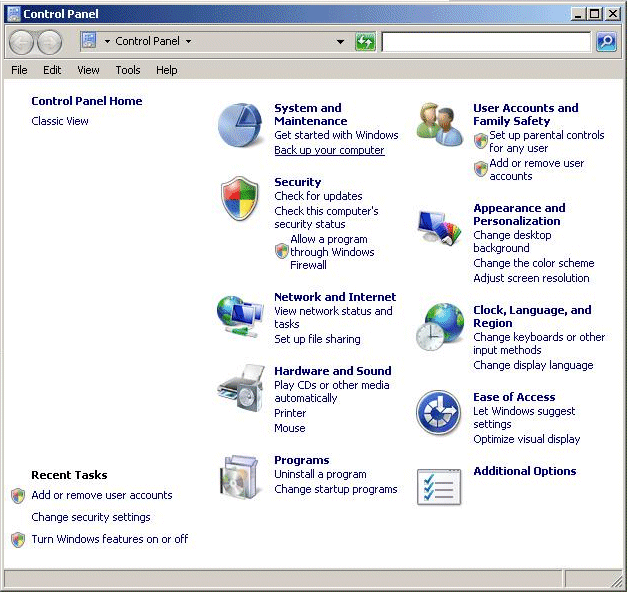
- Click the User Accounts and Family Safety option. The Control Panel\User Accounts and Family Safety panel appears.
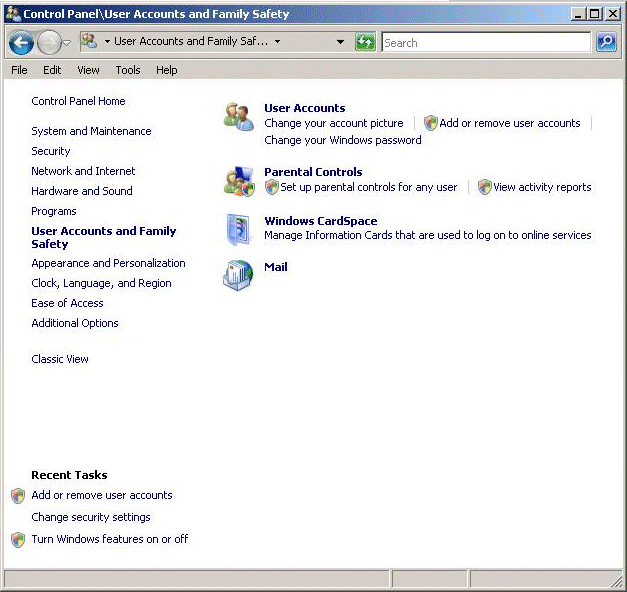
- Click the User Accounts option. The Control Panel\User Accounts and Family Safety\User Accounts panel appears.
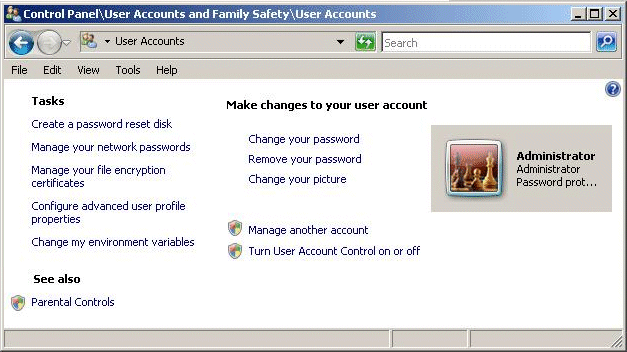
- Ensure the Use User Account Control (UAC) to help protect your computer option is disabled and then click OK.
- When prompted, restart the computer.
Note: This change will affect all users on the computer.
To enable the UAC, enable the Use User Account Control (UAC) to help protect your computer option.
Method Two - Using the Control Panel for a Single User:
This is a similar method to method one, but access to UAC via a user account.
- Click the Windows Start button, point to Settings, and then click Control Panel. The Control Panel appears.
- Click the User Accounts and Family Safety option. The Control Panel\User Accounts and Family Safety panel appears.
- Click the Add or remove user account option.
- Click the desired user account.
- Click Go to the main User Account page.
- Click Change security settings under the Make changes to your user account section.
- When prompted, restart the computer.
Note: This change will affect all users on the computer.
To enable the UAC, enable the Use User Account Control (UAC) to help protect your computer option.
Method 3 - Using the Registry Editor:
- Click the Windows Start button, and then click Run. The Run dialog box appears.
- Type regedit in the Open field, and then click OK. The Windows Registry Editor launches.
Caution: We strongly recommend that you back up the system registry before making any changes. Incorrect changes to the registry could result in permanent data loss or corrupted files. Please make sure you modify only the keys specified. For detailed information on backing up the Windows Registry, click the link below:
Title: How to Back Up the Windows Registry
Answer ID: 13807
- Once the Registry is backed up, browse to the following registry key:
HKEY_LOCAL_MACHINE\Software\Microsoft\Windows\CurrentVersion\Policies\System
- Locate the following DWORD registry subkey in the right pane:
EnableLUA
- Right-click the EnableLUA subkey, and the click Modify from the shortcut menu. The Edit DWORD Value dialog box appears.
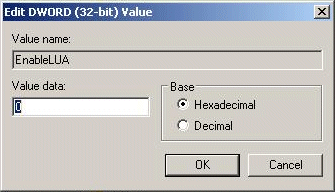
- Change the Value data field to 0 (zero), and then click OK.
- Exit the Windows Registry Editor.
- Restart your computer.
To enable the UAC again, simply change the value of EnableLUA to 1.
Method 4 - Using MsConfig System Configuration:
- Click the Windows Start button, and then click Run. The Run dialog box appears.
- Type msconfig in the Open field, and then click OK. The System Configuration dialog box appears.
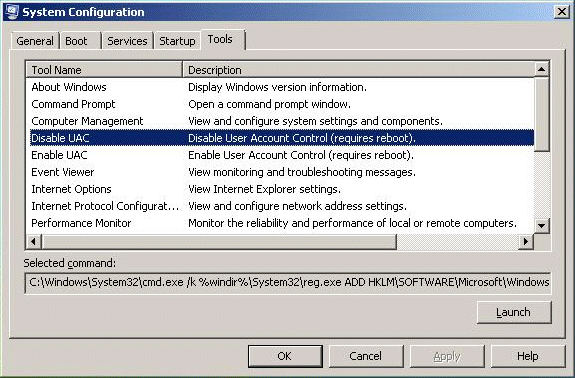
- Under the Tools tab location and select the Disable UAC option, and then click the Launch button. The following DOS window appears.

- Close the DOS window, and click OK on the System Configuration dialog box.
- Restart your computer.
To re-enable the UAC feature, select Enable UAP from the System Configuration dialog box, click the Launch button, and then restart your computer.
Method 5 - Using Group Policy:
If you’re an IT administrator or system administrator that manages many Windows Vista computers or clients across your computer, group policy can be an effective and easy method to mass enable or disable a group of computers. To disable UAC, both Local Group Policy or Active Directory GPO can be used.
- Click the Windows Start button, and then click Run. The Run dialog box appears.
- Type gpedit.msc in the Open field, and then click OK. The Group Policy Editor dialog box appears.
Note: If you’re using Active Directory Domain GPO which controls many computers, use the following steps to open the Group Policy Management Console:
- Click the Windows Start button, and then click Run. The Run dialog box appears.
- Type gpmc.msc in the Open field, and then click OK. The Group Policy Management console launches.
- In the Group Policy Management Console (GPMC) console, browse to the respective GPO which is linked and enabled to the OU (organization unit) or domain where the Vista computers are located, then edit it.
- Click Computer Configuration to expand, click Windows Settings to expand, click Security Settings to expand, click Local Policies to expand, and then click Security Options.
- In the right pane, locate and set the User Access Control policies as follows:
- User Account Control: Detect application installations and prompt for elevation, to Disabled
- User Account Control: Behavior of the elevation prompt for standard users, to No prompt
- User Account Control: Run all administrators in Admin Approval Mode, to Disabled
- Restart your computer.
|
|
Article Details
Last Updated
27th of February, 2009
|
|
Thank you for rating this answer.
|
|
 The article has been updated successfully.


