Question
You would like to know how to manually remove the ACT! by Sage 2008 (10.0) and ACT! by Sage Premium 2008 (10.0) software.
Answer
This Answer is divided into three sections: Preparation Tasks, Manually Removing ACT!, and Post Uninstall Tasks. Each is further divided into a section for each required specific type of function:
Preparation Tasks:
Creating Back Ups
Download and Installing the Windows Installer Clean Up Utility
Determining the ACT7 Instance MSSQL.<number>
Stopping the SQL Server (ACT7) Service
Ending Running Processes
Configuring Windows Explorer (or My Computer)
Manual ly Removing ACT!:
Removing ACT! Files and Folders
Removing ACT! Registry Keys
Removing Program Icons and Shortcuts
Post Uninstall Tasks:
Removing MSI (Microsoft Installer) Links
Removing Temp Files
Important Note: It is recommended before attempting this process to use the Uninstaller.exe. Please refer to the following Knowledge Base Answer:
Title: How to Use the ACT! Uninstaller.exe file
It is strongly recommended that you attempt a conventional uninstall of ACT! before performing the manual uninstall. Please refer to the following Knowledge Base Answers:
Title: How to Uninstall ACT! by Sage 2008 (10.0)
Important Note: If you have attempted to uninstall ACT! in the conventional way, or if you are having issues due to a partial install, you may not find all of the files, folders or registry keys described through this Answer. If you find this to be the case, simply move on to the next step in the solution.
Note: Some processes may resist deletion. Do not be overly concerned if this occurs; simply end as many unnecessary processes as possible.
Preparation Tasks: The following are tasks needed to occur before you can manually uninstall ACT!:
Creating Back Ups:
If you intend to continue using ACT!, please ensure that you have a current backup of all ACT! contact databases as well as your ACT! E-mail database. For detailed information on backing up your ACT! 2006 database and E-mail, please refer to the following Knowledge Base Answers:
Title: How to Back Up and Restore an ACT! Database
Answer ID: 19211
Title: How to Backup and Restore Personal Files in ACT!
Answer ID: 19251
Warning: If you are using Internet Mail, Outlook® Express, Eudora® or Local ACT! Folders for E-mail, it is imperative that you create a e-mail back up. You will permanently lose ALL e-mails if you do not create a back up.
Title: How to Back Up and Restore Your ACT! E-mail Database
Answer ID: 19212
Download and Installing the Windows® Installer Clean Up Utility:
You will need this near the end of this process. Use the following steps:
- Download the Microsoft® Installer Clean Up Utility from the following web page. (Save to your Desktop)
http://support.microsoft.com/default.aspx?scid=kb;en-us;290301
- Double-click the download file (msicuu2.exe) and follow the on screen directions for the installation process.
Determining the ACT7 Instance MSSQL.<number>:
Each SQL named instance is assigned a MSSQL.<number>. This is used by the SQL Server to identify the named instance. You will need this number to uninstall. Use the following steps:
- Click the Windows Start button, and then click Run. The Run dialog box appears.
- Type regedit in the Open field, and then click OK. The Windows Registry Editor launches.
- Navigate to the following location:
HKEY_LOCAL_MACHINE\SOFTWARE\Microsoft\Microsoft SQL Server\Instance Names\SQL
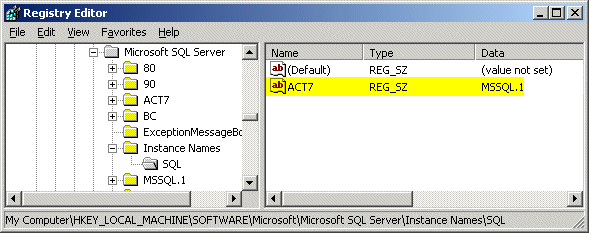
- Note the value in the Data column for the Name item ACT7. In our example it is MSSQL.1.
- Close the Windows Registry Editor.
Stopping the SQL Server (ACT7) Service:
You must stop the ACT7 service before you can manually uninstall:
- Click the Windows Start button, and then click Run. The Run dialog box appears.
- Type net stop "sql server (act7)" (including quotes) into the Open field, and then click OK. The following DOS window appears briefly.

- When the Dos window clears your ACT7 service is stopped.
Ending Running Processes:
- Right-click an empty space on the Windows Taskbar, and then click Task Manager from the shortcut menu. The Windows Task Manager launches.
- Under the Processes tab locate and select Act.Outlook.Service.exe item from the Image Name column, and then click the End Process button. The Task Manager Warning dialog box appears.
- Click Yes.
- Locate and select Act.Scheduler.UI.exe item from the Image Name column, and then click the End Process button. The Task Manager Warning dialog box appears.
- Click Yes. Close the Windows Task Manager.
Configuring Windows Explorer (or My Computer):
Ensure that Windows Explorer (or My computer) is configured to allow you to view hidden files. Follow these steps from Windows Explorer or My Computer:
- Launch Windows Explorer (or open My computer)
- Click the Tools menu, and then click Folder Options. The Folder Options dialog box appears.
- Under the View tab, in the Hidden files and folders folders section, ensure that the Show hidden files and folders option is enabled.
- Click Apply (if necessary) and then click OK.
- Close Windows Explorer (or My computer).
Manually Removing ACT!:
Note: If, prior to performing a manual uninstall, you attempted the uninstall from the Start menu or from Add or Remove Programs in the Windows Control Panel, you may not find all of the files, folders and/or registry keys described below.
Removing ACT! Files and Folders:
This procedure involves renaming or removing ACT! and the Microsoft SQL Server™ 2005 instance files and/or folders, removing specific registry keys and removing MSI (Microsoft Installer) links to the ACT! Software. Before removing the necessary items.
Follow the steps below:
- Launch Windows Explorer (or My Computer).
- Navigate to the ACT! Preferences folder in the following location:
C:\Documents and Settings\<username>\Application Data\ACT\
Warning: If you are using Internet Mail, Outlook Express, Eudora or Local ACT! Folders for E-mail, it is imperative that you create a e-mail back up. You will permanently loss ALL e-mails if you do not create a back up.
Title: How to Back Up and Restore Your ACT! E-mail Database
Answer ID: 19212
- Rename this folder to \ACT.old.
- Navigate to the ACT! program folder in the following default location:
C:\Program Files\ACT\ACT for Windows
Rename this folder to C:\Program Files\ACT\ACT for Windows old.
Note: Right-click the folder, and then click Rename.
- Navigate to the following folder:
C:\Program Files\Microsoft SQL Server\
Delete the MSSQL.<number> (from the Determining the ACT7 Instance MSSQL.<number> section above) folder .
- Navigate to the following locations and delete any folders named with an ACT! Product ID/(GUID) Globally Unique IDentifier:
Example: C:\Program Files\InstallShield Installation Information\{B32814DB-1A4B-4A74-B6D0-ED46E41A10C0}
C:\Program Files\InstallShield Installation Information
ACT! 2008 (10.0) GUID Numbers:
ACT! 10.0.0.214
Standard - {71B038DB-C1F0-45A1-B387-F6C3BE28154D}
ACT! 10.0.0.227
Premium - {0E99D7D9-A9A8-497A-9982-AB7ABA3841F8}
- Navigate to and delete the following files:
C:\WINDOWS\system32\Act7AB32.dll
C:\WINDOWS\system32\Act7Ext.dll
C:\WINDOWS\system32\Act9AB32.dll
C:\WINDOWS\system32\Act9Ext.dll
- Close Windows Explorer (or My Computer).
Removing ACT! Registry Keys:
Now that you have removed or renamed the ACT! and SQL instance related items from your hard drive, you must remove all ACT! references from the Windows Registry. Follow the steps below:
- Click the Windows Start button, and then click Run. The Run dialog box appears.
- Type regedit into the Open field, and then click OK. The Windows Registry Editor launches.
Caution: We strongly recommend that you back up the system registry before making any changes. Incorrect changes to the registry could result in permanent data loss or corrupted files. Please make sure you modify only the keys specified. For detailed information on backing up the Windows Registry, click the link below:
Title: How to Back Up the Windows Registry
Answer ID: 13807
- Once your registry is backed up, navigate to and delete the following folders:
HKEY_LOCAL_MACHINE\SOFTWARE\ACT|
HKEY_LOCAL_MACHINE\SOFTWARE\\Clients\Mail\ACT!7 Mail
- Navigate to the following folder:
HKEY_LOCAL_MACHINE\SOFTWARE\Microsoft\Microsoft SQL Server
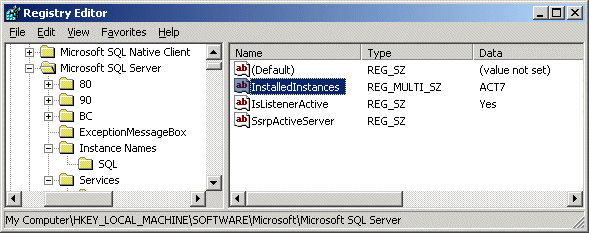
Right-click the Installed Instance value from the Name column with ACT7 for Data, and then click Modify. The Edit Multi-String dialog box appears.
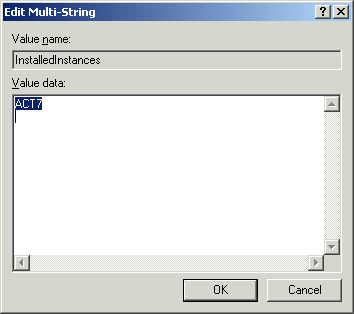
Clear all Value data, and then click OK. This will remove ACT7 from the Data column.
- Navigate to the following folder:
HKEY_LOCAL_MACHINE\SOFTWARE\Microsoft\Microsoft SQL Serve\Instance Names\SQL
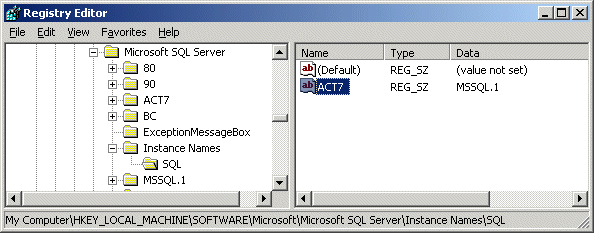
Delete the ACT7 value from the Name column with the MSSQL.<number> in the Data column. (Right-click, click Delete from the shortcut menu, and then click Yes on the Confirm Value Delete dialog box.)
- Navigate to the following location:
HKEY_LOCAL_MACHINE\SOFTWARE\Microsoft\Microsoft SQL Server
Delete the ACT7 and MSSQL.<number> (from the Determining the ACT7 Instance MSSQL.<number> section above) folders.
- Navigate to and delete the following folders:
HKEY_LOCAL_MACHINE\SOFTWARE\Microsoft\Windows\CurrentVersion\App Paths\ActDiag.exe
ACT! By Sage 2008 (10.0) with Microsoft SQL Server 2005 (Express)
HKEY_LOCAL_MACHINE\SOFTWARE\Microsoft\Windows\CurrentVersion\Installer\UserData\S-1-5-18\Products\7DDFFFA258DE09A4C825D59ABECDB9F8
--or--
ACT! by Sage Premium 2008 (10.0) with Microsoft SQL Server 2005 (Standard)
HKEY_LOCAL_MACHINE\SOFTWARE\Microsoft\Windows\CurrentVersion\Installer\UserData\S-1-5-18\Products\{7A87AFFF15DB552448074C4D8AB5945F}
- Navigate to the following locations and delete any folders that match the Product ID Numbers:
ACT! 2008 (10.0) GUID Numbers:
ACT! 10.0.0.214
Standard - {71B038DB-C1F0-45A1-B387-F6C3BE28154D}
ACT! 10.0.0.227
Premium - {0E99D7D9-A9A8-497A-9982-AB7ABA3841F8}
- If ACT! was installed with the Anyone who uses this computer option for Specify who can use ACT! on this computer (default):
HKEY_LOCAL_MACHINE\SOFTWARE\Microsoft\Windows\CurrentVersion\Uninstall\<GUID>
HKEY_LOCAL_MACHINE\SOFTWARE\Microsoft\Windows\CurrentVersion\Uninstall\InstallShield Uninstall Information\<GUID>
HKEY_LOCAL_MACHINE\SOFTWARE\Microsoft\Windows\CurrentVersion\Uninstall\InstallShield_<GUID>
- If ACT! was installed with the Only me option for Specify who can use ACT! on this computer:
HKEY_CURRENT_USER\SOFTWARE\Microsoft\Windows\CurrentVersion\Uninstall\<GUID>
HKEY_CURRENT_USER\SOFTWARE\Microsoft\Windows\CurrentVersion\Uninstall\InstallShield Uninstall Information\<GUID>
HKEY_CURRENT_USER\SOFTWARE\Microsoft\Windows\CurrentVersion\Uninstall\InstallShield_<GUID>
- Navigate to and delete the following folders:
Note: You may not have all of the following Control Sets. Remove the folders from the appropriate sets.
Control Set 001:
HKEY_LOCAL_MACHINE\SYSTEM\ControlSet001\Services\ACT! Scheduler
HKEY_LOCAL_MACHINE\SYSTEM\ControlSet001\Services\Eventlog\Application\MSSQL$ACT7
HKEY_LOCAL_MACHINE\SYSTEM\ControlSet001\Services\Eventlog\Application\SQLCTR$ACT7
HKEY_LOCAL_MACHINE\SYSTEM\ControlSet001\Services\Eventlog\Application\SQLAgent$ACT7
HKEY_LOCAL_MACHINE\SYSTEM\ControlSet001\Services\MSSQL$ACT7
HKEY_LOCAL_MACHINE\SYSTEM\ControlSet001\Services\SQLAgent$ACT7
Control Set 002:
HKEY_LOCAL_MACHINE\SYSTEM\ControlSet002\Services\ACT! Scheduler
HKEY_LOCAL_MACHINE\SYSTEM\ControlSet002\Services\Eventlog\Application\MSSQL$ACT7
HKEY_LOCAL_MACHINE\SYSTEM\ControlSet002\Services\Eventlog\Application\SQLCTR$ACT7
HKEY_LOCAL_MACHINE\SYSTEM\ControlSet002\Services\Eventlog\Application\SQLAgent$ACT7
HKEY_LOCAL_MACHINE\SYSTEM\ControlSet002\Services\MSSQL$ACT7
HKEY_LOCAL_MACHINE\SYSTEM\ControlSet002\Services\SQLAgent$ACT7
Control Set 003:
HKEY_LOCAL_MACHINE\SYSTEM\ControlSet003\Services\ACT! Scheduler
HKEY_LOCAL_MACHINE\SYSTEM\ControlSet003\Services\Eventlog\Application\MSSQL$ACT7
HKEY_LOCAL_MACHINE\SYSTEM\ControlSet003\Services\Eventlog\Application\SQLCTR$ACT7
HKEY_LOCAL_MACHINE\SYSTEM\ControlSet003\Services\Eventlog\Application\SQLAgent$ACT7
HKEY_LOCAL_MACHINE\SYSTEM\ControlSet003\Services\MSSQL$ACT7
HKEY_LOCAL_MACHINE\SYSTEM\ControlSet003\Services\SQLAgent$ACT7
Control Set 004:
HKEY_LOCAL_MACHINE\SYSTEM\ControlSet004\Services\ACT! Scheduler
HKEY_LOCAL_MACHINE\SYSTEM\ControlSet004\Services\Eventlog\Application\MSSQL$ACT7
HKEY_LOCAL_MACHINE\SYSTEM\ControlSet004\Services\Eventlog\Application\SQLCTR$ACT7
HKEY_LOCAL_MACHINE\SYSTEM\ControlSet004\Services\Eventlog\Application\SQLAgent$ACT7
HKEY_LOCAL_MACHINE\SYSTEM\ControlSet004\Services\MSSQL$ACT7
HKEY_LOCAL_MACHINE\SYSTEM\ControlSet004\Services\SQLAgent$ACT7
CurrentControlSet:
HKEY_LOCAL_MACHINE\SYSTEM\CurrentControlSet\Services\ACT! Scheduler
HKEY_LOCAL_MACHINE\SYSTEM\CurrentControlSet\Services\Eventlog\Application\MSSQL$ACT7
HKEY_LOCAL_MACHINE\SYSTEM\CurrentControlSet\Services\Eventlog\Application\SQLCTR$ACT7
HKEY_LOCAL_MACHINE\SYSTEM\CurrentControlSet\Services\Eventlog\Application\SQLAgent$ACT7
HKEY_LOCAL_MACHINE\SYSTEM\CurrentControlSet\Services\MSSQL$ACT7
HKEY_LOCAL_MACHINE\SYSTEM\CurrentControlSet\Services\SQLAgent$ACT
Removing Program Icons and Shortcuts:
If you plan to reinstall ACT! skip to the next step or use the following steps to remove program icons and shortcuts to launch ACT:
- Right-click the ACT! Icon on your Desktop, click Delete from the shortcut menu, and then confirm the deletion by clicking the Delete Shortcut button.
- Right-click the ACT! Icon on your Taskbar, click Delete from the shortcut menu, and then confirm the deletion by clicking the Delete Shortcut button.
- Click the Windows Start button, point to All Programs (or Programs), right-click the ACT! by Sage (Standard version installation) or ACT! Premium (Premium version installation) option, and then click Delete from the shortcut menu. The following Warning message box appears.
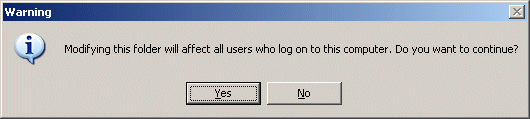
- Click Yes to confirm the deletion.
Post Uninstall Tasks:
The following are required tasks of the uninstall that not part of the ACT! installation.
Removing MSI (Microsoft Installer) Links:
After you have modified the registry, you must remove MSI (Microsoft Installer) links to the ACT! software. Follow the steps below:
Note: The following information is provided as a convenience. Sage Software, Small Business Division, does not provide support for Microsoft Products. For more information on this topic go to Microsoft.com.
- Launch the installer clean up Utility. If you installed to the defaults, click the Windows Start button, point to All Programs (or Programs), and then click Windows Install Clean Up option. The Windows Installer Clean Up Utility launches.
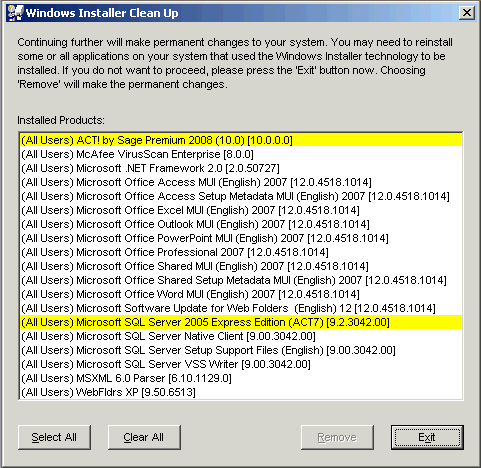
- Click any listings for ACT! (10.0.0.000) or ACT! 2008 (as illustrated above), and then click Remove.
Also click all Microsoft SQL Server 2005 items that include (ACT7) in the listing, and then click Remove.
Note: Ensure that you only select Microsoft SQL Server 2005 items that include (ACT7) otherwise you could corrupt other SQL instances and they will no longer function.
Removing Temp Files:
You must delete all files in the two Windows Temp folders. Use the following steps:
- Click the Windows Start button, and then click Run. The Run dialog box appears.
- Type %temp% in the Open field, and then click OK. The C:\Documents and Settings\User_Name\Local Setings\Temp folder window appears.
- Click the Edit menu, and then click Select All.
- Click the File menu, click Delete, and then confirm the deletion.
- Close the Temp window.
- Launch Window Explorer (or My Computer).
- Browse to C:\Windows\Temp.
- Click the Edit menu, and then click Select All.
- Click the File menu, click Delete, and then confirm the deletion.
- Close Window Explorer (or My Computer).
|
|
Article Details
Last Updated
27th of February, 2008
|
|
Thank you for rating this answer.
|
|
 The article has been updated successfully.


